

Refashioning Old Wedges

The shoe that I will refashion on this post is one of my favorite shoes before. I really like the sole because it looks unique so I somehow looked for a way to make the shoe useful again. As you can see this black wedge doesn’t seem wearable at all. The leather is synthetic, and since I don’t wear it often and just stuffed it with other shoes I’m no longer using, the leather got worn and you can see at how ugly it has turned out.
This is how the shoe looks like before I gave it a makeover:
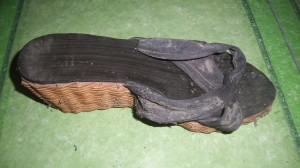
I doubt if anyone would want to wear this one.
Here are the materials I used to make this project:
Shears
2 inch Black elastic band
Sewing Needle
Black Thread
1/2 inch Nails
Hammer
Well, I don’t really have the step by step photo for this but I will somehow narrate what I did to make this shoe look wearable.
First I prepared the materials used. I already have a picture of what I wanted as a finished product. It somehow looked like this:

Charles by Charles David Women's Legit Wedge Sandal

Donald J. Pliner Sabri Wedge Sandal
I fused the idea together and here is what I had in mind as a finished product:

So how did I achieve this? First, I measured the elastic bands. I will dividing it in two parts, one for the crisscross and the other for the middle part.
Here is how the crisscross part looks like:

This would be the part were the elastic band forms a crisscross near your toe and ends up at the ankle.
Then measure the middle part. I sewed them together so it would look like a small circle and a the larger one forms like the number 8.
I put the crisscross portion at the front then nailed the sole to secure the elastic band, then attached the middle elastic band and nailed it again. So it will give you something like this:

I then put nails around, to secure the elastic band and the sole. After which, I sewed the 8 shaped elastic band together with the middle part. And here is how it appeared:

And here is the finished product when worn:
You can also attach felt fabric to the sole so that it feels softer when it touches your feet. Anyway, this is how my first DIY shoe makeover turned out. Look forward to more.


0 comments: